
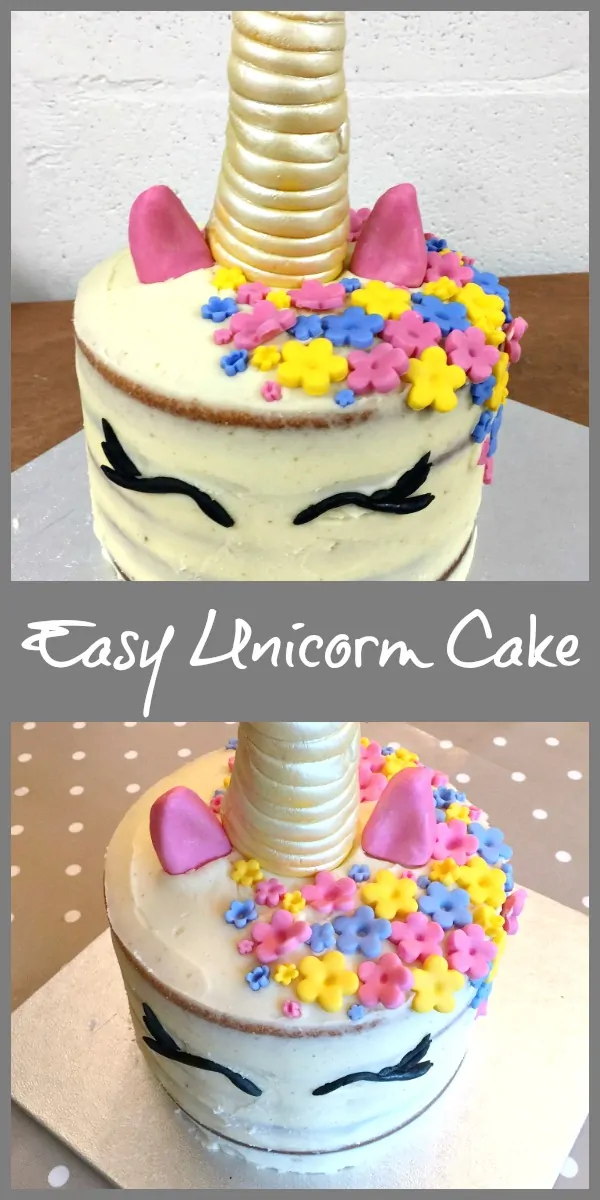
This cake, my easy unicorn cake, is really quite simple to put together and great for children. Perfect for a unicorn lover’s birthday party and easy to make too.

Birthday party season is here again for me (my children have birthdays one after the other in February and March!) and this year I made the rookie mistake of showing my younger daughter a unicorn cake I had seen on Pinterest.
Having a unicorn cake then became the most important thing ever EVER for her of course…. so I decided to make my own easy version of the buttercream covered unicorn cakes which are all over Pinterest and Instagram right now.
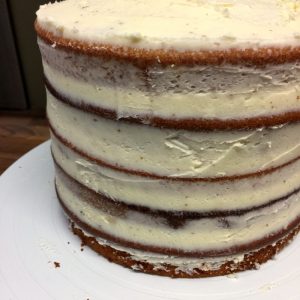
I went for a deep cake made of five layers, which gives you enough space on the side to add your unicorn’s eyes, and also allows plenty of cake to give out at the birthday party. Perfect for busy mums and dads!!
The decorations are easy to make from bought fondant icing, using a flower cutter for the decorations which make up the mane. This makes this easy unicorn cake easier and quicker to make than those with buttercream flowers!

You’ll still need plenty of buttercream frosting to cover and fill this many layers.
I had some buttercream left over after assembling my cake, though as you can see, there is a slight naked effect to my cake on the top and bottom layers as those edges are not quite covered.
I quite liked this effect so left it as it was.
Your mythical unicorn with its glittery unicorn horn, cute face and flowery mane is sure to be a hit with kids.
It is ideal for a unicorn themed party with unicorn tableware like paper plates, tablecloth and napkins, sweet-filled unicorn piñata (available in Tesco’s) and themed games like pin the tail on the unicorn.
Why not make my easy unicorn cake for your next childrens party?
Get the recipe below and find out how to make the decorations and ice the cake with buttercream.
Pin my easy unicorn cake for later!!
Recipe

Unicorn Cake
Ingredients
For the cake
- 450 g (2 cups) unsalted butter
- 560 g (2¾ cups) caster sugar (superfine sugar)
- 8 free-range eggs
- 600 g (3¾ cups) self-raising flour
- 2 tsp vanilla bean paste or vanilla extract
- 500 ml (2 cups) milk
For the buttercream icing
- 500 g (2¼ cups) unsalted butter at room temperature
- 1 kg (6¾ cups) icing sugar
For the horn, mane, eyes and ears
- 2 packs yellow ready to roll icing
- 1 pack black ready to roll icing
- 1 pack pink ready to roll icing
- 1 pack light blue ready to roll icing
Instructions
- Note: This amount of cake mixture makes all five of the layers. For my cake I halved the recipe and made it twice (as not all pans would fit in my oven at once).
- Beat the butter and sugar together before adding the eggs, flour, vanilla extract or paste and milk. Mix well until smooth.450 g / 2 cups unsalted butter, 560 g / 2¾ cups caster sugar (superfine sugar), 8 free-range eggs, 600 g / 3¾ cups self-raising flour, 2 tsp vanilla bean paste or vanilla extract, 500 ml / 2 cups milk
- With the first mixture I made three layers, baking two together and the last layer after the first layers were baked and coooled, as I only have two round 8 inch tins. Then with the second mixture I made two thicker layers, splitting the mixture between just two tins.
- Bake for 20-25 minutes at 170℃ / 340℉, test with a cake tester and then remove from the oven.
- Leave the cakes to cool completely.
- In the meantime, place the butter for the icing in a stand mixer, and beat for several minutes until light and fluffy. Sieve the icing sugar and add it a little at a time. Keep beating all the time. Once all added, add the milk then beat for around five minutes at medium speed.500 g / 2¼ cups unsalted butter, 1 kg / 6¾ cups icing sugar
- Level and trim your cakes and check what order you want to stack them in. Use a turntable if you have one to help with applying the icing.
- Using a spatula or palette knife, spread the icing between each layer until the cakes are all stacked up. Add a thin layer of the buttercream as a crumb coat, using your palette knife or offset spatula to smooth on the icing. If you don’t have a palette knife or offset spatula you can also use the back of a bread knife too.
- Once the crumb coat is applied, place the cake in the fridge for about half an hour to chill the buttercream.
- After the crumb coat has set, remove from the fridge and apply more buttercream using your palette knife or spatula. Dip the knife in a bowl of hot water, and then dry, to help smooth the icing. Fill all the gaps between the layers so you have even sides.
- Here you can see my buttercream icing in progress. Gaps between layers are being filled and the cake is on the way to even sides. More buttercream needs to be applied to cover the middle layers.

- Once the sides are smooth, you can apply the decorations. I've made some shortcuts here as I don't have a lot of experience with this type of cake decorating.
- To make the horn:Make a cone shape out of yellow fondant icing, then make a long coil of icing and wrap it around the cone. Flatten the coil by rolling it. Spray it gold with gold glitter spray and leave to dry.2 packs yellow ready to roll icing
- To make the eyes and ears:Make ear shapes out of pink icing. Make eye shapes out of black icing. Don’t forget the eyelashes.1 pack pink ready to roll icing, 1 pack black ready to roll icing
- To make the mane:Cut out flower shapes out of different colour icing (I used yellow, blue and pink). I used a daisy flower cutter I already had to make these flowers. If you are good at piping buttercream roses, you can substitute the flower shapes with different colour buttercream roses, which looks very pretty.1 pack light blue ready to roll icing


Claire @foodiequine says
Stunning Cake! My daughter would love it. Alas its always shop bought Birthday Cakes here – pretty baking is not my forte.
bakingqueen74 says
thank you Claire, nothing wrong with a shop bought one for convenience!
Kavey at Kavey Eats says
I think my favourite aspect is the use of the flowers for a flowing mane! It’s really beautiful and best of all, looks achievable for us mere mortals!
bakingqueen74 says
Thanks Kavey x
Jacqueline Meldrum says
It looks fabulous, but I don’t think I’d find it so easy. Shared 🙂
bakingqueen74 says
Thanks Jac, it’s just a bit easier than the other ones I’ve seen hehe